1. Choose a book.
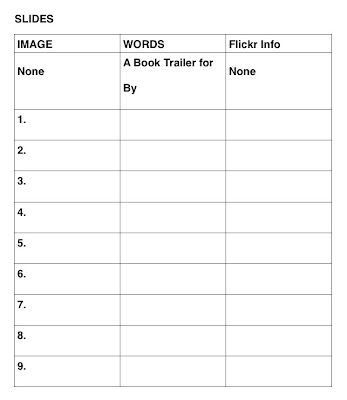
2. Answer the five basic 'W' questions and how. My student planning sheet looked like this:
3. Pick 9 important events in your book's plot using your W question answers for reference. Make sure not to include the ending of the book. I tell the students this is like an advertisement for a book. Below is the document the students used to record their plans.

4. Choose an image that represents each point and one picture of the cover of the book.
At this point we went on the computers and went to www.flickr.com to find our pictures for the images. I insist that students go to Advanced Search in Flickr and choose the Creative Commons option. When they find an image that works the student must choose at least the Medium 640 size option or the pictures will be pixelated. See the difference of quality in the videos below.
First Version
Second Try
I also require students to save the name of the photographer for their credit page. Here is how I evaluated. As this was a part of a computer class I evaluated on the skills needed to create the video, if this had been a Language Arts project then the evaluation would have been more focused on those outcomes.
5. When the students found all their images then we used Live Windows Movie Maker to create our trailers. In our division the students could not use pictures saved to a drive on the computer for Movie Maker so we used USB sticks. The students saved all their images to their USB stick before they started. Movie Maker is a fairly easy program to use. Students sometimes found that captions stayed on the screen over two pictures so they needed to adjust the length of time each picture was shown. In Movie Maker students may type out their captions or record them. My students did not record their voices.
6. Finally students chose music. We used a royalty free music site called Incompetech
It allowed students to choose by genre. The music is all instrumental, I believe, and comes in various lengths. The students needed a piece of music that was around one minute long. Students could preview the different pieces and then downloaded the one they wished to use. They needed to make sure it was downloaded to their USB stick. The students again needed to adjust their slide lengths so the music played through the entire trailer. The students also needed to credit the music they picked on their credits slide. Below is an example of a finished Book Trailer using Movie Maker:
7. I did this project later with my grade three class and they used PhotoStory. I had them record their voices as part of their projects but they used the create your own music feature instead of finding royalty free music. Also, they put their photo credits on each slide instead of at the end. Here is an example of a Book Trailer done in PhotoStory:
8. Finally, when the trailer is complete you should save it at the highest quality possible. Then you can upload it to YouTube to post on your class or school website.


No comments:
Post a Comment